Friday 8 December 2017

If You Love Your World, Set It Free

My world is ending.
It's been ending for a long time.
One apocalyptic scenario after another has wracked my campaign. Death Frost Doom unleashed a horde of the Dead. Some shithead's starter dungeon from long ago unleashed the the demon armies from the west. The Mould came out of a weird old lump in the forest, causing societal breakdown due to the increasing numbers of mould addicts.

All things that could take over the world, maybe ruin a part of it.
None of them would destroy it.

Until now.

The Beast in the Core of the Earth is the World.
And it is rising.


The Highest Stakes

This is pretty exciting! I guess I've always had the end of the world in mind in my game, or at least  willingness to let vast swathes of it get destroyed/impacted/changed by various perils. Running LotFP adventures will do that to you.
But despite all that, this is the first time I'm straight up looking at the end of the entire world.

It's no doubt a reflection of my own vague nihilism that I've ended up with this "ha ha life on earth was some meaningless cosmic accident" apocalypse. The rise of Shub-Niggurath from inside the Earth was always intended to be my version of the Lovecraftian menace that doesn't give a shit about you because it works on spans of time far beyond human comprehension. It's not some epic battle of good and evil, it's not someone with great power getting corrupted absolutely, it can't be reasoned with or stabbed to death, it just is.

And while I'm sure lots of high level D&D campaigns have featured world-threatening events, there's usually something you can find or someone you can kill to prevent it.
I don't know how my players are going to prevent this one, honestly. I sure hope they pull it off though. It'd sure be nice if they saved my world for me!

Maybe the biggest part is just being able to step back and say to myself, "you know what, it's been like 6 years in this one little patch of planet. Am I ok with it getting blowed up?" and yea, I guess I am. It'd be pretty cool.

For the record, this final apocalypse, as with all prior lesser apocalypses, was triggered by the players. They cured one doom, only to unleash another. Such is the way of things!


Saving the World with 10HP

I've saved the world before in lots of games. DnD once or twice, and certainly a heap of times in video games.
Kill monsters, level up, get sweet loot, kill more monsters, and eventually become strong enough to kill the big bad. Classic.

Except my campaign reeeaaally isn't set up for that. Characters die with some frequency, new characters come in at level 1, and getting as high up as level 6 takes like a whole year.
Getting strong enough to kill the locus of the apocalypse is straight up not the way this thing is going to work out.
So how are they going to do it? Especially since there's no real way to out-fight a world-cancer even if they were a party of One Punch Men?

So far, it looks like the plan is to exploit other world-ending threats and daisy chain a solution to the apocalypse. Get an apocalypse dragon to defeat Shub-Niggurath, then use the unstoppable hordes of undead to defeat the dragon, and so on and so on.
The "There's a Hole in my Bucket" world-saving gambit, essentially.

I fucking love this.

All these different factions have been around for a good while, my players have been in my game for years so they know them pretty well. And now they've got a cause to try to unite the warring clans to prevent the end of everything?
Fuck yea!

Ordinary people saving the day through sheer luck and guile and straight up diplomacy is completely my jam. My whole game is pretty much the story of a party of plucky fools with a few extra abilities making the best of bad situations, forming relationships, and doing their best to get rich without dying trying. Somehow the whole game has been leading up to this, and it works!

There's also the very real possibility that my players will find some way to bullshit or edge-case their way out of this thing. They usually do. No doubt there'll be some artifact somewhere, or some bullshit ability they gain, or even some random object someone has in their inventory right now that will change things up massively.

Basically, instead of ramping up the power level I'm going to try to keep that low-power high-lethality gritty fantasy feel going.
If the world dies, it dies. But man, my players sure seem like they're going to give Shub-Niggurath a run for its money.
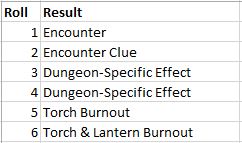
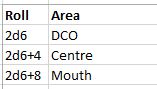


Next time:

Some tools I'll be using to throw my whole world into the shredder.

Saturday 14 October 2017

So It Looks Like You're Gonna Die

Perttu pushed me to this. You're the best, Perttu! You have forced me to become my best self.

Behold, an actual table pamphlet where I actually pulled everything together! 


Grab pdf here!
Doc here if you want to edit it!


It's designed as a booklet for table use, as in someone gets to 0HP and you slap it down in front of them like it's a Dealing With Grief pamphlet or something.

"Fuck I died".
"NOT QUITE!"
Throw booklet.

Letting the player look up their own death table results and working out what gory thing just happened is a lot more fun than me reading it out off a table. Plus it means they get the mechanics better than me flipping coloured beads at them and saying "YOU BLEED NOW".

Rose & Kingfisher has an additional Psychic death table here if you need that too! (I sure as hell will!)


This is based directly on Courtney's Table For Avoiding Death, and all the writing is directly plagiarised.
If you like it, go back and report about it! That part remains.

The only things I've added are the Bleeding table, and trimming off the fatty status effects in favour of clean Bleed/Pain/Trauma tokens.

The other day we had a super great player-on-player battle due to a series of unfortunate events, which ended up in the gory death of both PCs. It went great, especially since the Barbarian was raging and so couldn't physically die despite getting a rapier to the brain. It was super awesome.


Tuesday 29 August 2017

Death and Dismemberment: Redux

The Death and Dismemberment rules in my game are probably my favourite subsystem. They're gnarly, they break bones, they claim limbs, and they let people survive with horrible injuries.

But all my house rules are meant to be a grab bag of pick-and-choosable bits and pieces, and this whole thing seems like it's too big and complicated to slot easily into someone else's game.

So let's break it down into chunks so you can chop off the bits you want. Dismember my dismemberment rules I say!
I'll start with the core mechanic (the Chassis) and give a bunch of +1 Add-ons so you can flavour to taste.

Some overarching stuff as we begin:
- Grab Courtney's sicknasty Table for Avoiding Death. It's crucial.
- You may need this additional table for Bleed damage I made.
- Pretend HP isn't in the game for now. All attacks hit your actual meat.
- Read "Internal Bleed" as "Trauma" because I renamed it.
- Ignore any 3e-style status conditions in italics liked Dazed or Nauseated. Use these for flavour, not mechanics.
- Design notes are in Courier.


The Chassis

Mechanics:
- When an attack hits you, gain a DEATH TOKEN.
- Then roll 1d6 for each DEATH TOKEN you have (including the new one)
- Add the damage you took to the result and look it up on the death table.

Ignore the mechanical stuff at the end.
Just read out the main description and make up some mechanics if it seems brutal enough, like losing an eye or limb. Nice and easy.

Notes:
Say you have 2 Death Tokens and are hit for 2 damage. You get another Death Token (bringing you to 3 total) then roll 3d6+2 on the death table. Simple!
The first hit probably won't kill you unless it did a ton of damage, but the next one will probably start chopping off limbs and stuff.
If you get hit a bunch of times in one round they'll really fuck you up.


These glass craft bead things are perfect for Death Tokens. Use different colours if you use some variant rules!

+1: The First Aid

Additional Mechanic:
- The First Aid skill can be used to remove Death Tokens.
- On a successful First Aid roll, you can remove a number of Death Tokens equal to the number rolled. So if you've got 4 in 6 First Aid and roll a 3, you can remove 3 Tokens.
- If you roll a 6, you deal 1 damage to your patient. This will very probably trigger a roll on the death table! If it does, use the additional entry for Bleeding damage.

Notes:
The key advantage First Aid has over a generic Cure Light Wounds is that it takes only a single action, while CLW takes a whole round to cast.
The key disadvantage is that you could kill your patient... it's happened.


+1: The Death Spiral

Additional Mechanic:
- Every time a death table result says you gain PainBleed, or Trauma, gain that many additional Death Tokens.

Notes:
These will convert into Pain Tokens, Bleed Tokens and Trauma Tokens if you use specific variant rules.
This means that the gnarlier results make further rolls on the death table more brutal.
Remember to read Internal Bleed as Trauma! I'm sticking with this!


+1: The Pain

Additional Mechanic:
- Whenever you would receive a generic Death Token you instead receive a Pain Token.
- A Pain Token counts as a Death Token but has special mechanics tied to it.
- Each Pain Token you have gives you a -1 to AC and -1 to all your rolls.

Notes:
Each Pain Token makes it harder to fight since you're on your last legs.
They're renamed Pain Tokens here because the next add-on rules can give you Trauma Tokens and Bleed Tokens too.
Barbarians reverse this Pain Token effect while raging!


HHNNNNGGG


+1: The Knockout

Additional Mechanic:
- At the end of your turn, count how many Pain Tokens you have accrued. Roll your class Hit Die. If you roll equal or below your number of Pain Tokens, you have been Knocked Out and are now unconscious.

Notes:
This is intended to stop a Black Knight situation from happening where a character's arm or leg is chopped off and they can just hop around with no consequences as long as they don't get hit.
Meatier classes like Fighters (and especially Dwarfs) are likely to keep standing due to their hefty hit die. Wimpy Magic Users with their 1d4 Hit Die go down quick.


+1: The Trauma

Additional Mechanic:
- If you get a result on the death table that says Trauma, instead of gaining that many generic Death Tokens, gain that many Trauma Tokens instead.
- A Trauma Token counts as a Death Token but has special mechanics tied to it.
- At the end of your turn, count how many Trauma Tokens you have accrued. Roll your class Hit Die. If you roll equal or below your number of Trauma Tokens you have been Killed by shock/internal bleeding/catastrophic organ failure.

Notes:
Read Internal Bleed on the death table as Trauma etc etc.
When paired with Pain Tokens from The Knockout, you can have a chance to get Knocked Out and a smaller chance to die from Trauma.
This is one of those big game changing rolls where everyones' eyes are LOCKED on that die as it bounces across the table.


+1: The So Much Blood

Bleeding damage table here.

Additional Mechanic:
- If you get a result on the table that says Bleed, instead of gaining that many generic Death Tokens, gain that many Bleed Tokens instead.
- A Bleed Token counts as a Death Token but has special mechanics tied to it.
- At the end of your turn, count how many Bleed Tokens you have accrued. You take that total as damage.
- This can (and often will) trigger a roll on the death table. Use this additional entry for Bleeding damage!

Notes:
I feel like the perils of blood loss are heavily downplayed in fiction for whatever reason. Blood is important, yo!
The biggest peril with Bleed Tokens is that you pass out and bleed out while you're unconscious. You need help before you bleed to death!


+1: The Stay Down

Additional Mechanic:
- If you have accrued Death Tokens, you can decide to Stay Down.
- If you Stay Down:
  - You lose your turn.
  - You count as Surprised against all attacks.
  - You don't roll for Knockout from Pain Tokens, you don't roll for death from Trauma Tokens, and you don't take damage from Bleed Tokens.

Notes:
This turns Death Tokens from an "oh shit" race against time into a choice. Can I risk Staying Down?
Do I go out of the fight? Or Stay Down until an opportune moment?
Spellcasters face a tough choice - Stay Down? Or risk casting a spell? Bear in mind spells go off at the end of the round in my game, so it's very possible to pass out mid-cast.
Bear in mind you can't use this ability if you're actually unconscious, so if you pass out with Bleed Tokens you're fucked and will probably bleed out.

Obviously don't use this one if you're not using at least one of The Knockout, The Trauma, or The So Much Blood.


"Yea I reckon I'm gonna Stay Down mate"

+1: The Hit Points

Additional Mechanic:
- You have a pool of HP! This is a shield of luck and skill between you and Death Tokens.
- While you have HP, instead of receiving Death Tokens when damaged, you reduce your HP by the damage of the attack.
- When an attack reduces you to 0 HP, you receive your first Death Token and add any excess damage to your roll on the death table.
- Any effect that states it heals HP (Cure Light Wounds etc) heals Death Tokens first on a 1:1 basis, then rolls over onto HP. So if you have 3 Death Tokens and get healed for 5 HP, you will remove 3 Death Tokens first and then roll over the excess 2HP into your HP pool.

Notes:
Ha ha I'm pretending that HP is an add-on! It's probably easier to think of it that way.
It should hopefully be fairly obvious, but HP is like your shields in Halo, or like Grit in Last Gasp
When you run out, they start hitting meat.


This system is literally to stop this from happening


Putting it all together

Hopefully this gives you some idea of how you can mix and match the different bits!
The only real change from my initial conception is calling them "Death Tokens" instead of "Death Dice", which I think makes it easier to explain.
It also means I'm not relying on people having a bunch of different coloured d6's! You can just tell someone to write down "Pain 1" on their sheet if you don't have extra props!

There's a lot you could mess with because there are a lot of moving parts. I mainly like it because it takes character death out of my hands. It's the dice that kill you, not me! It also adds an extra level of unpredictability to proceedings and a lot of high-pressure decision making when you go down.

I've updated the Poison rules because it turns out that was way easier to understand if I use "Death Tokens" instead of "Death Dice" too!

I'll update the house rule doc soon, mostly to just find-and-replace "Death Dice" with "Death Tokens".

Enjoy! Feedback appreciated because I know I've struggled to explain this in the past.


Example of Play if you're using the whole lot

I'm going to assume you just stand there and never choose to Stay Down for this. You're fighting an enemy who does alarmingly consistent damage - 6 per round.
I'm trying to explain each step in depth, in case it helps!

Round 1:
You are a Fighter. You have 10 HP.
An enemy hits you with a sword. They roll 6 for damage.
It's soaked by your HP. You now have 4 HP.
How frightfully original.

Round 2:
You are a Fighter. You have 4 HP.
An enemy hits you with a sword. They roll 6 for damage.
4 points of damage are soaked by your HP. You now have 0 HP, and 2 points of damage going through.

Immediately - resolve Death Table:
You gain a Pain Token, a special type of Death Token. You now roll 1d6 for every Death Token you have and add the damage that got through your HP.
You roll 1d6+2, since you only have 1 Death Token and have 2 points of damage going through.
You get a 4.
Result: "You are struck by the flat of the blade and see stars. You are Dazed for 1 round."
We ignore the Dazed condition because I'm not using that stuff, so you're ok! Just a Pain Token to worry about.

At the end of your turn - resolve Death Token effects:
Roll your class Hit Die (1d8 for Fighters). If you get equal or less than your total Pain Tokens (1), you fall unconscious.
You get a 3.
No worries!

Round 3:
You are a Fighter. You have 0HP.
An enemy hits you with a sword. They roll 6 for damage.
You have no HP left to soak. You have 6 points of damage going through.

Immediately - resolve Death Table:
You gain a Pain Token again. Two Pain Tokens total. You now roll 1d6 for every Death Token you have and add the damage that got through.
You roll 2d6+6, since you have 2 Death Tokens and 6 points of damage going through.
You get a 13.
Result: "A cut rips open your forehead. Blood gushes down into your eyes. First Aid: Shaken and Blind. Bleed 2."
We ignore the Shaken condition because that sounds 3e-ish, but I can guess what blindness is! You're blinded by blood until you work out a fix or someone successfully First Aids you.
"Bleed 2" means you also gain 2 Bleed Tokens. Nasty!

At the end of your turn - resolve Death Token effects:
Roll your class Hit Die (1d8 for Fighters). If you get equal or less than your total Pain Tokens (2), you fall unconscious.
You get a 3.
No worries!
You also take 1 damage per Bleed Token you have accrued (2).
You take 2 damage.

Immediately - resolve Death Table
You gain a Pain Token. Yea it's fucked up. Three Pain Tokens, 2 Bleed Tokens, for a grand total of 5 Death Tokens.
You now roll 1d6 for every Death Token you have and add the damage that got through.
You roll 5d6+2, since you have 5 Death Tokens and 2 points of damage going through.
You get a 16.
"You black out, smacking your head badly. Pain 2. Bleed 1d4. Prone. Barely conscious until recovery."
Pain 2 means you gain 2 more Pain Tokens.
Bleed 1d4
 means you gain 1d4 Bleed Tokens. You roll a 3, gaining 3 more Bleed Tokens.
You're on the floor and barely conscious until you can recover from the blood loss.
You're fucked.


Round 4:
You are a Fighter. You have 0 HP.
An enemy coup de grace's you with a sword. They deal 6 damage.

Immediately - resolve Death Table:
You gain another Pain Token. That's 6 Pain and 5 Bleed, for a grand total of 11 Death Tokens.
You now roll 1d6 for every Death Token you have and add the damage that got through.
You roll 11d6+6 on the Death Table, since you have 11 Death Tokens and 6 damage going through.
You roll a 32.
Result: "Your jaw is separated from your face. The pain is overwhelming and you thrash about making a horrible tongueless screaming noise as you die over the next 1d6 rounds, spraying blood on everyone adjacent".
Vicious!

Take 3d6 and a new character sheet. Better luck next time!


Monday 14 August 2017

Improving Your Encounter Tables With Gimmicks!

Encounter tables are the lifeblood of my game.

Overland encounter tables are probably the single most reusable thing you can make, make it once and just use it over and over forever, and the steady beat of the dungeon encounter roll is the time pressure that penalises overcautious parties.

I mentally divide encounter tables into vague categories - Dungeon, Overland, and City.

So here's some tips.


Dungeon Encounters

This is based on Brendan Necropraxis' Overloaded Encounter Die aka the Hazard System.

I assume you know how to stock a dungeon encounter table - just put whatever you'd find on this dungeon level in the table, plus maybe a homeless wandering beast or two and some scouts from the next level of the dungeon.

Roll the Encounter Die every 10 minute turn. In my game I track this fairly loosely. Down long hallways I might start eyeing up squares and movement rates, but this usually gets rolled any time the party stops to investigate a room, messes around with the scenery, or they Take a Break to eat and heal.
"Are you guys aware that this will take long enough to need an encounter roll?" is something I say whenever somebody wants to spend time poking around a room.

Anyway, the Encounter Die results are as follows:


1. Encounter
Your classic encounter. Roll number appearing, make a Reaction roll, roll Surprise if necessary and go.
In a dungeon it's usually quite easy to make up a reason for what they're doing there based on the surroundings and/or the party's recent activity.

2. Encounter Clue
Roll for an encounter, but give a clue about what's out there instead.
Maybe they hear it growling, or voices down the corridor, or see a silhouette in the distance. Corpses are good too, whether it's of the encounter creature or one of its victims.
Basically just make something up that gives an impression of what's out there.

3 & 4. Dungeon-Specific Effect
This is the big one. Effects are on a per-dungeon basis and supposed to give some unique character to the locale.
A more dangerous area will have more directly dangerous results, while a safer area might simply be set dressing.

In the Spooky Dungeon, 3 might be "Chill up your spine! Hirelings check morale." and 4 might be "ankle-high fog floods through rooms and corridors, hiding anything on the ground this turn".
In the Earth Elemental Dungeon you could have "Earthquake! Save vs Stun or fall to the ground! Unsecured objects jostle and fall" and "Floor becomes a muddy quagmire, halved movement this turn".
The Tentacle Dungeon had "Distant groaning and shuddering sound, denizens distracted by the great tentacle's sermons this turn" and "Questing tentacle slithers through room, will summon enemies if disturbed".

Basically put a couple of interesting environmental effects in this category. Between these results and the encounters, different dungeons will hopefully feel very different from each other.

5 & 6. Light Source Burnout
Torches have two checkboxes. Lanterns have 4 checkboxes.
On a 5 or 6, tick off a torch checkbox.
On a 6, tick off a lantern checkbox.

This means that, on average, torches last 6 turns (1 hour) and lanterns last 24 turns (4 hours). Just like they're meant to! Plus there's some variance in how long they last. How lovely.


Overland Encounters

You can do a lot of messing about with Overland encounter tables.
The beating heart of my overland encounter tables is this absolutely inspired Procedure for Wandering Monsters by John Bell.
The core innovation is that you have a standard table of encounters paired with a sliding scale of severity. You roll for encounters and also roll a d6 for severity.
If players are up for it, they can keep track of the numbers rolled so they can predict what's out there.
You end up with something like this:
Click to Expand - or Drive sheet here
As you can see, each Encounter also has an entry for Lair, Spoor, Tracks, Traces and Traces/Benign.
This is explained at the link, but I'll reiterate how I do it here for ease of access.


Severity


Encounter: Your classic encounter. You basically stumble right into the situation, or they stumble into you.
Lair: Either an actual lair, or a situation where they're real close. Either way, you might be able to avoid an encounter if you take immediate action.
Spoor: They're real close! Encounter easily avoided, but also easily approached.
Tracks: Evidence that something's been past here recently. You can usually follow the tracks if you want.
Traces: Some evidence pointing to the existence of the encounter in the area.
Traces/Benign: Some more evidence or, if I can't think of anything, some vaguely on-theme set dressing.


Weighting Tables

You likely already know about bell curves, where the average result of two or more dice is most likely to occur. On overland encounter tables I usually use 2dX, so it's weighted towards the middle of the table, and put the most common encounterables there.

The clever thing you can do is vary what you roll on the table to get some variation within the area.
Maybe you don't want the elven forest to be completely homogenous, and want to weight it so there's more magic treant stuff near the centre, and more natural normal stuff near the edges of the forest.
Maybe you want the Dragon to only be found near its lair on the east of the map.
Maybe you've got two factions in the area and you want more of one faction to be around their base in the north, and more of the other around their base in the south.
You don't need to break the area into smaller zones, just vary what you're rolling.

There's two main ways I do this:

Roll Different Dice
Down the bottom left of the encounter sheet image above, you'll see that the dice rolled on this encounter table change based on how dangerous the area is.
This table is for the Contested Farmlands area of my map, where man and necromancer alike are still dealing with the aftermath of Death Frost Doom.
In the safer areas close to cities and on main roads you only roll 2d6, limiting the results to the safer lower end of the table.
As you go deeper into unsafe territory, you roll 2d8 and then 2d10, increasing the scope of possible encounters and making the result more likely to be undead-related.

Roll+X
The other way I weight tables is to just add something to the roll.
On my River encounter table I wanted encounters to shade between the weird creature infested Deep Carbon Observatory aftermath at the top of the river, and the less fucked up area at the river mouth.
This means that results 2-5 can only be found in the DCO area, and results 17-20 can only be found at the rivermouth. So this is where you put the big rare stuff that's very specific to those areas, like a big ol' age of sail galley at the river mouth, or a big ol' Giant Cuttlefish around DCO.
Everything in between can be found further away from that main starting point.
Remember, the average roll also changes this way, so result 7 will be very common in the DCO area, rare in the Centre and, and not seen at all at the River Mouth.


Using Excel for fun and profit

Excel is fucking great, and you can do a lot of encounter table automation with it.
I'll go into the wacky world of automated subtables in the City Encounters section, but for now allow me to tell you a really simple trick.
You'll want to grab a copy of this sheet.

The main trick is RANDBETWEEN, aka the Excel diceroller.
=RANDBETWEEN(1,6) will roll 1d6.
=RANDBETWEEN(1,10)+RANDBETWEEN(1,10) will roll 2d10.

The other trick is that you can chain text into a formula with & and quotation marks.
="Ghouls ("&RANDBETWEEN(1,12)&") led by a Ghast" will give you Ghouls (1-12) led by a Ghast.

Thus endeth the lesson.


City Encounters

The trouble with towns and cities is that I want to make the district/borough/area unique, but also allow each district to be part of a cohesive whole.
So unlike, say, having a different encounter table for the Forest and the Mountains, or rolling different dice in different areas of the Forest, I want one that has a fair amount of overlap while also giving each area its own flavour.

First you want to split the city into zones. In Moondin, a town that was in the middle of riots, I had a central Anarchy Zone and several other zones under the control of various factions.
My campaign map's capital, Fortress-City Fate, has 12 main districts arrayed like the face of a sundial. Each district is defined by the sort of businesses or housing that the area is known for.

Rather than have a separate encounter table per district (too much effort), we're going to have table entries we swap out per district. The other results will be permanent fixtures or subtables that remain the same no matter where you go.

Here's the encounter table for Fortress-City Fate. It's the most complex one I have since it's the most important city in the country, and players can get embroiled there quite easily.

Drive link here if you want to check it out, you'll have to save your own copy though!

Man that's a lot of subtables and lookups!
It's all automated on the actual sheet, but this calls out what each thing means.
Cells highlighted in yellow point to subtables for things you'll see or experience in any district of the city.
Cells highlighted in blue are swapped out depending on the district.

The encounter roll at the bottom is the equivalent of the overland severity roll, just more loosely defined and city-related.
Clash between two encounters (result 3) isn't necessarily a fight, just one result affecting another.


District Differences

The blue-highlighted per-district results are the most important part.
My hope is that players who get lost, or find themselves popping out of a manhole somewhere after a deep dive into the undercity, might be able to work out where they are based on these.

For instance, Result 7 is "Common Local Encounter", which is the population you'll see most often in an area. It pulls from the following table:


So in the Lower Class district you'll often see money-grubbing urchins, while in the Learning district you'll come across lots of boisterous students.
Bear in mind that if the players look around they'll probably see these types of people, rolling them as an Encounter just means they're directly notable.


City Subtables

The yellow-highlighted cells are subtables for things that can happen anywhere in the city. This could be because it's a more generic result (like thieves), something that could happen anywhere (like a cart crash) or something that affects the entire city (like a rainstorm).

As an example, here's the City-Wide Event subtable:


This stuff could happen anywhere. You may notice that some results are from Vornheim, steal from it liberally!


Excel Again

You can automate this whole process with Excel. Rather than flipping between tabs or physical pages to use subtables, you can just pull everything into the one front page.
As an example of the final result, check these out.

Entertainment area

Middle Class area

If you already know the wonders of VLOOKUP (or its mighty brother, Index Match) then you have finished the blog post! Congrats!
For those who don't, you were going to have to learn one day.

First, make a table. Numbered first column, results in second column. Standard D&D stuff.

Second, set up your auto-roller with VLOOKUP. To our D&D-trained eye, the formula looks like this:
=VLOOKUP(Die Roll,Random Table Location,Column,FALSE)

Replace Die Roll with our good friend RANDBETWEEN. As in the Overland Encounters section, this is the Excel dice roller.
RANDBETWEEN(1,6) will roll 1d6.
RANDBETWEEN(1,10)+RANDBETWEEN(1,10) will roll 2d10.
Adjust to however many "dice" you want to roll on the table.

Replace Random Table Location with the coordinates of your table. 
If your table is between Cell A1 and Cell B10, this will be A1:B10.
Usually you just click and drag over the area.

Replace Column with 2 for a simple two-column table. This means that we'll get the result from the second column, ie. the results.

Keep FALSE as is. It needs to be there for some reason.

And voila! Your very own hands free in-Excel dice roller and results-giver.
Top tip: you can press F9 to reroll.


That's all folks

There's a bit of extra Excel bodgery going on in the Fate encounter table, but it's mostly based on VLOOKUPs. Feel free to poke around! If you need a hand, send me a message.

Tuesday 11 July 2017

Animal Training for Non-Rangers

Animal Companions are a pretty sweet gig, but what if you don't have quasi-mystical mental control over your pet beast?
Looks like you're going to have to train it the hard way.

Instructions on how to use the spreadsheet itself are at the end, but links are here for convenience:
Animal Training sheet is here. (So you can save your own version)
Excel verson is here (Works better, click on the yellow box on the Lookup tab to get a drop-down menu of available creatures)
Gygaxian Democracy sheet that YOU can add to is here. (Add new creatures to the Backend tab and it should all update automagically)

This training system should result in a lot of emergent complexity from some fairly simple rules. That's the plan, anyway.

Doggo, LEAP STRIKE!

Animal Instinct

Each type of animal has four natural Instincts.
Take the humble dog.


This is the natural instincts of a dog, boiled down to four things.
In any given situation, the dog will follow these instincts.
If there is some doubt as to what the dog does in a situation, choose the course of action that satisfies the most Instincts. That's what the Weight column is for, just add them up and see which course of action has the most Weight.

But not all dogs act the same, right? That's silly! Let's add a random personality.


This dog LOVES to play. It's a very friendly dog. In fact, given the choice between barking at a stranger and playing with them, it'll choose to play every time.
Personality gives +1 to a single instinct, randomly chosen when you generate the dog.
This means dogs are generally either playful, yappy or clingy-protective. Good enough for me!

Finally, the most important part. Training!


With Training, you can adjust each of the dog's instincts up or down by one point.
So if you wanted a guard dog, you'd train it so it has +1 in "Bark at potential danger" and -1 in "Run around and play".

The exception to this whole thing is that every animal has the fourth instinct to Survive.
This always has 1 Weight, can't be Trained, and can't be boosted by Personality.
Every animal has the will to Survive. The only way to get over that instinct is to outweigh it. A dog's will to Survive can be outweighed by its will to protect its master.

The main wrinkle here is that the players have to work out what instincts an animal has. Fairly obvious for dogs, but more important if they try to train some exotic beast!


GOOD PUPPY YOU SO FANCY


Training examples:

This dog has been trained as a guard dog. His instincts are weighted so he'll bark at strangers and protect his master.
Note that you can't completely train the dog's personality away, this guy will always want to run around and play if he's got nothing else to worry about. You can't train all the dogginess out of a dog.

This dog has been trained to be the friendliest dog in the world. His instincts are weighted so he'll will always prefer to run around and play (even at the expense of protecting his master) and never barks at danger.
Good for being your bestest friend, bad for adventuring.

Non-Dogs

So that's the basic concept, animals have Instincts and you can Train them to enhance or reduce how much they follow those instincts.
The neat part is that these instincts are different depending on the animal.

Here's a horse:

This horse will stay in his stall if he hears a loud noise, because "Remain safe and secure" is more powerful than "Flee danger and noise".
A more skittish horse with a "Flee danger and noise" personality might run away as soon as it hears a loud bang, causing horses with strong "follow the herd" instincts to follow!
The trick with a horse is to make the horse consider you part of their herd, much like the trick with a dog is to make him consider you his master.

And here's a giant spider:

Good luck training this thing, she's got no instinct that makes her want to follow you. Spiders aren't domesticated. Without Training, the best you could do is try to make her change her territory, and maybe chase her towards enemies with a light. Make sure you're not on your own though, because this spider's instinct to "Ambush lone prey" outweighs its instinct to "Stay away from light"!

This is a good example of why the Survive instinct is important. If this spider sees lone prey with a light wandering about outside it's territory, it won't bother approaching.
But if the spider is hungry, the need to Survive will clock in and it'll leave its territory and ignore its light aversion in order to eat that tasty morsel.
Keep a spider hungry if you want it to eat your foes!

You could use this for working out wild creature's reactions if you wanted to go that far, but you'd do just as well with a reaction roll honestly. Best for pets.

The other trick with predators - try not to be considered Prey

Teaching Tricks

"But how do I teach my doggo to play Fetch?" you say.

Behold, the Learned Instincts section aka Tricks.
The Learned bit is where you put new instincts you've trained into your dog.
Two crucial points:
- Once an animal fills up a slot with a trick, it can't be unlearned. That's permanent. You can't teach an old dog new tricks and all that.
- Not all animals can learn new tricks. Dogs get all 4 slots, horses get 2 slots, undomesticated beasts (like Giant Spiders) get none.

Let's train your doggo to Sit, Shake, and Sic Balls.
You can improve or negate these learned instincts through Training, like natural instincts.
If you want your command to Sic Balls to outweigh the dog's instinct to Survive, you'll want to add +1 to that learned instinct through Training.
But if you give away your dog to a good home, training him not to Sic Balls on command any more is probably a good idea!


But How Do You Actually Train Things

Honestly, for all the layered complexity of this system, I'm leaving that to player skill.
The core difficulty of this system on the player side is:
- How do I identify the creature's instincts?
- How do I train those instincts?

Instead of an Animal Handling skill, it's on them to work out what a creature wants and what to do to train it. Plus, since it's player skill, they'll get better at training a certain type of animal over time.

The other issue is time.
You don't have to be especially strong or kind or wise to train an animal, but you do need patience.

Training an existing Instinct takes one week.
This can be done during normal adventuring time, presumably while you're resting between adventuring days.
You have to say what you're doing to train it. If it can't understand what you're trying to make it do, or you really freak it out, or otherwise fuck up - see Stress Mishaps below.
If you succeed, at the end of the week it gets a +1 or -1 to whatever instinct you were working on!

Teaching a new Instinct takes one week.
This has to be done during downtime, no adventuring for you while you're training a new trick!
You have to say what you're doing to teach it. If you try to teach it more tricks when it's already filled up those slots, or really freak it out, or otherwise fuck up - see Stress Mishaps below.
If you succeed, at the end of the week fill one of its Learned Instinct slots with the new trick!

I figure it's up to the DM to work out what is and isn't good for a particular animal. What's good for a dog isn't useful for a horse, etc.
Of course, in either case, you could pay a trainer to train your animal for you. Dog trainers and horse trainers are likely to exist, basilisk trainers not so much. You're on your own there!

This is a lot of work, but if you want perfect control of an animal you should play as the animal dominator class. Otherwise it's on you to train your beasts as best you can!


Stress Mishaps

All that said, this is basically just programming. Sometimes there will be times when your pet simply locks up based on this simple AI, usually because it has two equally weighted but conflicting options on what to do.
In a non-stressful situation it'll probably just lie down or look around for food.
In a stressful situation it needs something to break the deadlock. That's when a Stress Mishap happens.

And as above, if you fuck up training your animal you'll stress it out and cause a Stress Mishap too.


Just roll a d6 and see what the animal does! Gaining a permanent +1 to Personality will hopefully be fun, because it means an animal can get more set in its ways over time.

Walkies is over

The Table Itself

With all that knowledge at your side, and without further ado, here's the tables.

Animal Training sheet is here. (So you can save your own version)
Excel verson is here (Works better, you can use the List on the first tab to see what's available)
Gygaxian Democracy sheet that YOU can add to is here. (Add new creatures to Backend and it should all update automagically)

And here's the basics on how to use them:

Lookup


This first page is where you can look up the instincts of a particular animal.
Put a "Y" under "Personality?" to generate a random personality. Put an "N" if you're going to choose it yourself.
In Excel, clicking the yellow box will give you access to a drop-down menu (down arrow to the right) with all the available animals in it. It's pretty neat.

Individual Player Tabs

This is where you put each PCs unique beasts so you can track them and update them whenever they get trained or stressed.

Template

Probably best to copy-paste values from this Template tab rather than the Lookup tab.
To paste values: Copy an area then press Ctrl+Alt+V and select "Values".

Backend

This is where the magic happens - the database of all the creatures and instincts you've added thus far.
When adding a new creature:
- Put its name four times in the Creature column (so it's easy to sort)
- Add 3 animal-specific instincts plus Survive
- Add how many Learning Slots it has at the end of the row.

Everything should have updated automatically, so you can go ahead and try typing it into the Lookup tab to see if it pulls everything through correctly.

Henchmen

Woah, henchmen are on here?!
Yes, turns out this works out ok for human minions too. It feels weird to put them on the Animal Training table but there you go.
The big difference is that they check Morale if you ask them to do something they're not inclined to do. On success, they do it anyway.
Also you can't train people like animals (probably). Instead, after every session or delve, add an extra thing that they've learned that might influence their future actions.
"Don't trust the PCs" is a common one, naturally.

There's an entry for generic hired Henchmen, and an entry for Followers who are your more unique NPC characters and hangers-on. The latter get some bespoke "instincts" that describe how they act on a more individual level.

Sunday 4 June 2017

Unified House Rule Document Update AND Handy Linked PDF

Mid-year update whaaaat.

Mostly this is because I'm always a little bit "oh no!" when I discover someone's been reading the house rule doc and it's NOT UP TO DATE OH NO.

Occasionally I get a comment that's like "hey could you put all the Lorebonds and elf powers and stuff into the one pdf?" so that it can basically be played out of the box.
The answer is - kinda!

You can now find a Linked PDF Version here. Intended to be used/perused digitally, everything you need an external resource should have a handy-dandy link.

You can find the non-Linked PDF Version here. Intended to be printed out for table use.


Linked Version

Unlinked Version


For context for some of these changes, at the beginning of the year we had the campaign's first ever TPK! So we skipped the timeframe forward half a century so people could see what's happened in the interrim.
How exciting!

Change Log:

Religion:

- Added Zeanism, based on the teachings of one of the player characters who took the Termaxian "do whatever you want, the gods aren't watching!" thing to heart.
Basically this is the drug religion now, and the Cleric spell allows you to take drugs with no downsides!
- Termaxianism has changed in the last 50 years, mostly because they're pretty sure that God lost the final war for all creation. Now it's up to them to finish the fight. No change besides their general lore.
- Nonanism is now accepting of the Undead and Necromancy in general. Pragmatism or corruption? Who can say? Another lore change, they're mechanically the same. 

Char Gen:

- Removed the Cartographer equipment pack because it contained paper and pens and I can't be fucked to enforce the need for paper in order to draw a map any more. It was a boring idea anyway.

Experience Points:

- Added Party Roles as directly inspired by John Bell at the Retired Adventurer. This has been real useful for keeping track of stuff and keeping players engaged even if they're not directly involved in the action.

Living Standards:

- Originally you needed to get to Comfortable conditions in order to heal from 0HP to 1HP, no longer! Otherwise it interacts weirdly with the "Take a Break" option where you eat a ration to heal 1d6 HP.
- Comfortable conditions now give you an extra 1d6 bump if you're already at full health! You'd imagine everyone would prefer comfy sleeps, but if you get nothing extra at max health you may as well save your money and live in a bin.
- Splendid conditions grant 1d6+level extra temp HP, since Comfortable conditions stole that thunder.

Big Purple d30 Rule

- Now upgrades a single die roll to the next die size when used. Previously you could replace any single roll with the Big Purple d30, which had the surprisingly underwhelming effect of making it an "I Win" button. This compounded by the large number of d30s players would accrue through buying me beer...

Downtime Activities

- Magical Research went through a few changes to make it slightly more interesting.

Fancy Combat Actions

- Changes to Sneak Attack. Now you roll when attacking from surprise to find your extra attack bonus, and enemies with high Awareness (renamed Search) have a chance of avoiding the damage multiplier.

Fancy Combat Reactions

- Split these off into their own heading.
- Parry covers all defensive melee actions. Smaller weapons can counter, larger weapons can disarm, and setting spears against charge is now covered under the Parry banner.

Melee Weapon Types

- One day I'll probably either remove these or make them Fighter-only, but for now I'm simplifying further. I've got lots of players and don't want things to stay as fiddly as they were.
- Axes remain the same - double damage on evens vs low armour.
- Hammers get +2 vs Chain or better. Straight up.
- Swords get +1 to hit across the board. Versatile, never a bad choice, a little boring.
- Knives give bonus damage if you beat their AC with your Wrestle Roll because you're shanking the shit out of them.
- Whips remain.

Ranged Weapon Options

- Flintlocks are in the game post-timeskip! Hurrah! That's basically it.

Death & Dismemberment

- Rewritten for the millionth time. This remains one of my favourite subsystems but boy is it hard to explain when you're not just passing out dice around a table.

Running Away

- Added a section on this very important aspect of not dying.

New Skills

- Search renamed to Awareness.
- Sneak Attack: When attacking from Surprise, roll Sneak Attack. On success, gain the result as a bonus to hit. If the enemy fails an Awareness check, multiply damage by your whole Sneak Attack score. Even your standard 1-in-6 character gets a little benefit maybe.

Saving Throws

- Hey what I renamed them! Makes it easier, and I don't think I ever called a save vs device.
- Stun, Doom, Blast, Law, Chaos.
- All as per usual, except Law is your save vs Lawful magic. Makes that more of a divide I guess!

Also one of my players made a rad new character sheet. Hurrah!